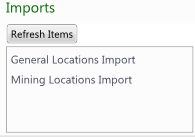
Data which can be imported will be presented within Data Management grids that have been assigned to Data Import page types. Each item listed in the pane represents a table that data may be imported into within MiiNT.
In the above pane example, data may be imported and mapped into the General Locations table using the General Locations Import template.
The process below will show/demonstrate how to import mining locations and their coordinates. The same process will be applicable for importing other data, although the fields and validation will be different.
Select the template you wish to use to import data to the selected table(s). A blank grid will appear to the right containing the fields mapped for importing within the chosen template.
Note: You will not be able to import data from a file whilst it is open in Excel.
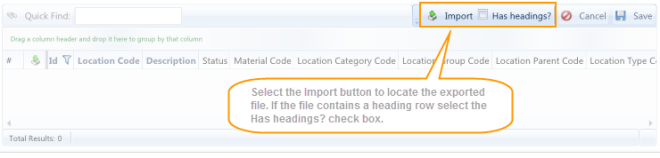
Select the Import button to display an Open dialog, from where the exported file can be opened.

An Import Results prompt will appear summarising the number of valid and invalid records imported. Select OK to continue.
NOTE: Invalid records will either need to be updated in the import grid or back in the csv file and imported again.
The Ignore / Include Checkbox will be selected for valid records and not selected for invalid records. Scan across the grid to find the error, this will usual occur when trying to import a blank field or an incorrect value for a field due to field lengths or invalid characters.
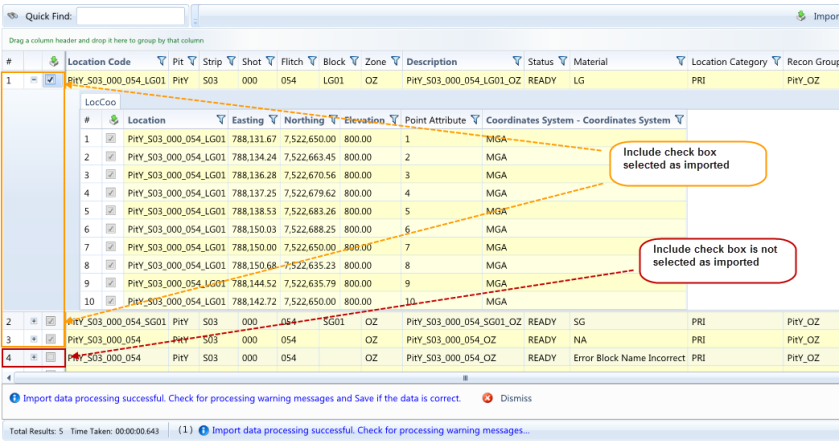
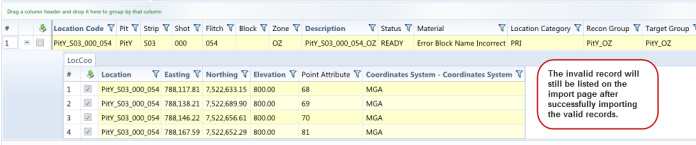
In the above example 4 valid mining location records and 1 invalid record have been imported, along with their location coordinate records.
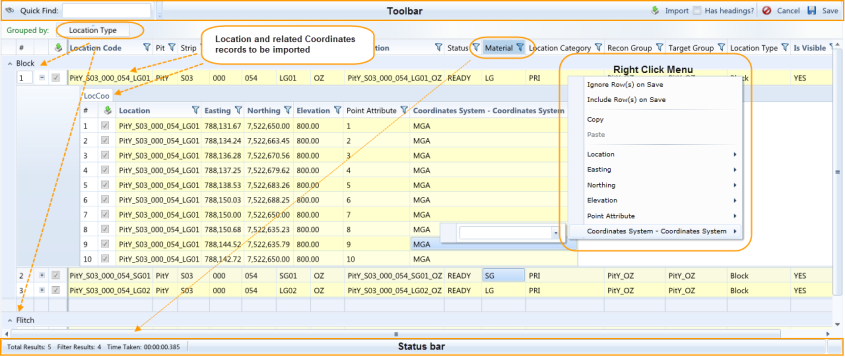
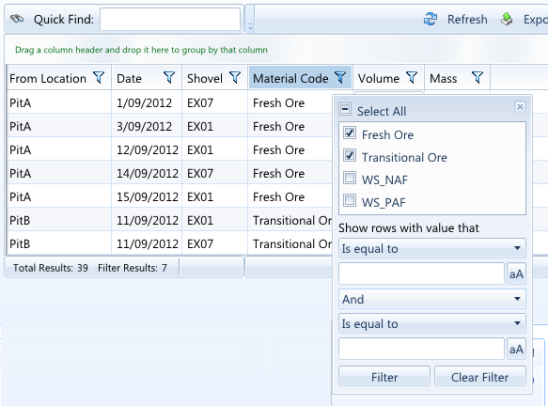
In the above example 4 location records have been imported for mining locations along with related location coordinate records. The results have been grouped by LocationType, with additional filtering on the Material column.
The Totals row in the Status bar at the bottom of the data grid displays the number of records imported and the number of currently filtered records.
Note: Only column values highlighted with a yellow background can be adjusted.
Note: You may make any necessary adjustments to invalid records here or in the import file.
Select the Save button to save the valid records to the database. A message will be placed in the Status Bar stating the number of parent records saved.

Hover over the message in the Status Bar to open up the Message panel. The message will disappear after a few seconds, alternatively you can select the Dismiss button to remove the message.

The invalid record will still be listed on the import page after successfully importing the valid records.
The following features can be used for Data Management Imports:
| Action | Description |
|---|---|
|
Toolbar |
|
|
|
Use the Quick Find field to locate required records whilst you type. Refer to the Quick Find section for more information on how to quickly locate records. |
|
|
Use the Import button to import data exported from another system in comma delimited format (.csv). |
|
|
Select the Has headings? check box if the exported comma delimited file contains a heading row. |
|
|
Use the Cancel button to clear the imported data. |
|
|
Use the Save button to save the import and commit all the valid records to the database. Note: Upon successfully saving MiiNT will clear out all the valid results leaving only invalid records. |
|
Grouped By |
|
|
|
Place column headers here to group the records by the column values. Refer to the Grouping section for more information on how to group records by a column. |
|
|
The Location Type column header has been moved to group by Location Type. |
|
Grouping sub totals |
Displays a sub total for each grouping. |
|
Headers |
|
|
|
A tooltip containing a description for the field will be displayed when you hover over a column header. Note: This tooltip can be used to provide meaningful information on the fields and can be entered in the Description attribute on the Data Management Queries page. |
|
|
Columns can be moved by dragging the column header to another spot in the headers row. |
|
|
To Filter data select the Filter icon to the right of the column you wish to filter on, to display the Filter options. Refer to the Filtering section for more information on how to filter records. |
|
|
Click on the header to sort in alphabetic order. Refer to the Sorting section for more information on how to sort records. |
|
|
Mandatory fields require a value to be entered and are identified by their column headers with a bold font. In the example to the left the Location Code field is mandatory whilst the Pit field is optional. |
|
Right Click Menu |
|
|
Ignore Row(s) on Save |
Use the Ignore Row(s) on Save option to deselect row(s) by right clicking on a row and selecting the option. Refer to the Ignore / Include Rows section for more information on how to ignore / include imported record. |
|
Include Row(s) on Save |
Use the Include Row(s) on Save option to select row(s) by right clicking on a row and selecting the option. Refer to the Ignore / Include Rows section for more information on how to ignore / include imported record. |
|
Copy |
Use the Copy option to copy the contents of selected cells within a single row by right clicking on a cell within the row and selecting the option. The copied values will then be available to paste into the same cells of other rows where any cells have been selected. Alternatively, Ctrl-C can be used to copy from selected cells. Note: This option is only available when cells from a single row have been selected. |
|
Paste |
Use the Paste option to copy values from the clipboard and paste to the same cells (fields) in the rows of any selected cells by right clicking and selecting the option. Alternatively, Ctrl-V can be used to paste to selected cells. Note: This option will only be enabled when values have been copied. |
|
Location, Easting, Northing, Elevation, Point Attribute and Coordinates System - Coordinates Systems |
The Right Click context option displays the fields available for the selected data management query that may be imported. In the above example the related Location Coordinates fields are displayed for editing because the right click occurred on a cell in the related table grid. If the right click had occurred on a cell within the Location table, the editable fields from the Location table would have been displayed. Note: It is possible to apply the change value of a field to several selected rows. |
|
Ignore / Include Row |
|
|
|
Use the Include / Ignore check box to mark individual rows to be ignored or included when saving imported records by deselecting or selecting the check boxes in the column to the left of the grid. Refer to the Ignore / Include Check Box section for more information on how to ignore / include imported records. |
|
Status bar |
|
|
|
A count of the total number of records imported from the file. |
|
|
A count of the number of records being displayed after column filtering has been applied. |
|
Keyboard Keys |
|
|
Tab |
Select the Tab key to move from field to field across the grid and to the next record. |
|
Esc |
Press the Esc key once to cancel the editing of a field. |
|
Fields |
|
|
Data Entry |
Whilst typing a value into a field, a lookup of existing values will be filtered down, allowing you to select one of the values as an alternative to typing the full value, or you can press the Tab key to automatically select the 1st value from the lookup as you move to the next field. Note: This only occurs on text fields. |
|
Read Only |
Non highlighted fields are read only and cannot be adjusted.
|
|
Editable |
Only fields highlighted with a yellow background can be adjusted.
|
|
Validation |
Field validation will occur when you move away from the field. Refer to the Data Management Import Validation topic for more validation information. |
|
Lookups |
All text fields will contain a lookup of existing values.
|

To Filter data select the Filter icon to the right of the column you wish to filter on to display the Filter options. From where there are various ways to filter the data on.
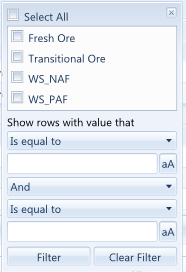
The data will be filtered as you select the required filter values and the column header will be highlighted blue.
Note: The column header is not highlighted when filtering is applied to the General Locations and Mining Locations grids.
To remove the Filter, simply select the Clear Filter button or remove previously selected filter values.

To Group data simply drag a column heading to the Grouped by area above the headings row.
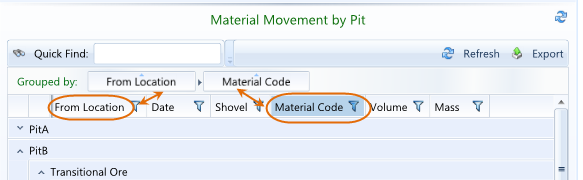
To remove the Grouping, simply drag the column heading from the Grouped by area back to the column heading area.
Note: Report queries will be automatically grouped by any groupings set within the query and the column heading(s) will be placed into the Grouped by area.
The records may be sorted into ascending or descending order by the values of the selected column. It is also possible to sort additional column values within the previously selected column values.
Click on any column heading to sort the records in ascending order by the column values. The background colour of the heading will be changed and a little triangle will appear above the column heading. Click on the column heading a second time to sort the records in descending order by the column values. Click on the Column heading a third time to remove any sorting.
After sorting the records by a column select another column whilst holding the Shift key to sort the records by the 2nd selected column within the 1st selected column.
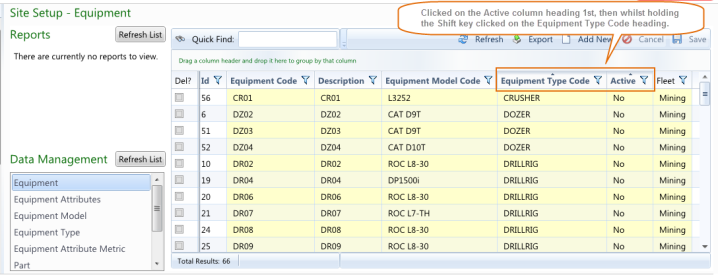
In the example above the equipment records are sorted by Equipment Type Code within the equipments Active status.

The Quick Find option can be used to quickly locate all records that contain the value that is being entered. Use the icon to clear the entered value.

It is possible to export the results in the following formats:
Note: Any filtering applied to the data grid will be reflected in the exported results.
Refer to the Creating Import Templates topic under the Administration Menu for information on creating Data Management Import pages.